Where to begin ASP.NET development? What is Visual Studio? Do I need IIS? What is IIS? How do I get started with ASP.NET?
These are the questions I hear a lot from people who are interested in getting started with ASP.NET development but don’t know just where to begin. This introduction tutorial should provide you with enough information to get you started with ASP.NET development.
If you don’t have Visual Web Developer Express installed, you can get one from here or if you are a Vista user, you can use the Web Platform Installer from Microsoft. Visual Web Developer is a special edition Visual Studio product that is specified in developing ASP.NET applications. I’ll refer to it just as Visual Studio in this article.
You will find out during this tutorial and later that Visual Studio is an awesome tool. When I was starting my work with ASP.NET, the first thing that impressed me was Visual Studio so even when you can use
something else (even notepad), I highly recommend you stick with Visual Studio. You can also get the Visual C# Express Edition so you can develop windows applications. In full Visual Studio you can develop all these application types.
As you can see, I’m using C# in this tutorial. I started with Visual Basic some years ago but after I switched to C#, I’ve never looked back. If you have prior VB experience you may want to keep using that. You can still follow this tutorial but keep in mind that you need to do something a bit differently. I’m not going to discuss C# in this tutorial. This tutorial is aimed to give you a general picture of ASP.NET applications so you can take the first step towards the new world.
Open Visual Web Developer to get started. First thing to do is to create the project. There are two options for us. Either to create a “website” or a “web application” project. I highly recommend creating a web application project. The name tells us that it’s a project. By selecting “website” you only have what’s in the file system just like in PHP projects but the “web application” project is a real project, like in windows applications, with project specific information. For this tutorial you can use the “website” also but I recommend the “web application.” With team system and multiple developers, it becomes even more important to have the project so it’s a good idea to get used to using it.

Creating a new web application project
To create the project click File | New Project…
to open the dialog above. On this dialog you can see all the project types available to you. Your options can differ from mine if you don’t have the same modules installed. Choose the web category and from there the ASP.NET Web Application option. Type a name for your project and choose the location where to save it. The location doesn’t need to be IIS web server folder. Visual Studio has a development server so you can test web applications even if you don’t have IIS installed.
Visual Studio also creates a Solution for your project. Solutions are basically containers for your projects. They can include one or more projects. Basically solutions give you a way to keep your projects organized in big projects. You can open one solution at a time in Visual Studio so placing projects under a solution enables you to work with multiple projects with only one Visual Studio instance open. When creating a solution with multiple projects it’s recommended that the projects relate somehow with each other. Placing just random projects under one solution will only lead to chaos and problems. Good example would be to place the UI-, BL- and DA-layer projects under one solution. That way your application is only one solution but you still have all your logical layers separated into projects. In big applications you might have to separate the application to multiple solutions.
Choose a name for your solution, for tutorial purposes you can choose the same as what you had for project name. By checking the ‘Create directory for solution’ -check box, Visual Studio creates a new folder under the one you specified with the same name as the solution you typed. After you have everything selected you can click OK and watch how Visual Studio creates the solution and project for you.
New project initial screen
After some Visual Studio magic, the new project has been created and opened in your Visual Studio. I’m not going to go through every part of Visual Studio UI, but let’s take a closer look at the Solution Explorer which can be found on the top right corner. If you can’t find it, select View | Solution Explorer.
The first item in your list is Properties. That’s the project properties! You can open the folder and see that there is a file called AssemblyInfo.cs inside it. Assemblies are a bit hard to explain in common language but let’s just say that they provide distributable library of classes and defines their scope. The assembly contains the compiled CIL as well as Metadata about the assembly, like version, author, token key, etc… So that’s what the AssemblyInfo.cs file is all about. It contains information about the created assembly. Assemblies are also known as logical DLL’s. I know this explanation left you cold but you don’t have to understand assemblies right now. It’s enough to know that the AssemblyInfo.cs file has something to do with that.
If you are still hungry to know more? Read this article from Microsoft about understanding assemblies and namespaces in .NET: Understanding and Using Assemblies and Namespaces in .NET
Let’s double-click the Properties item to see something cool.
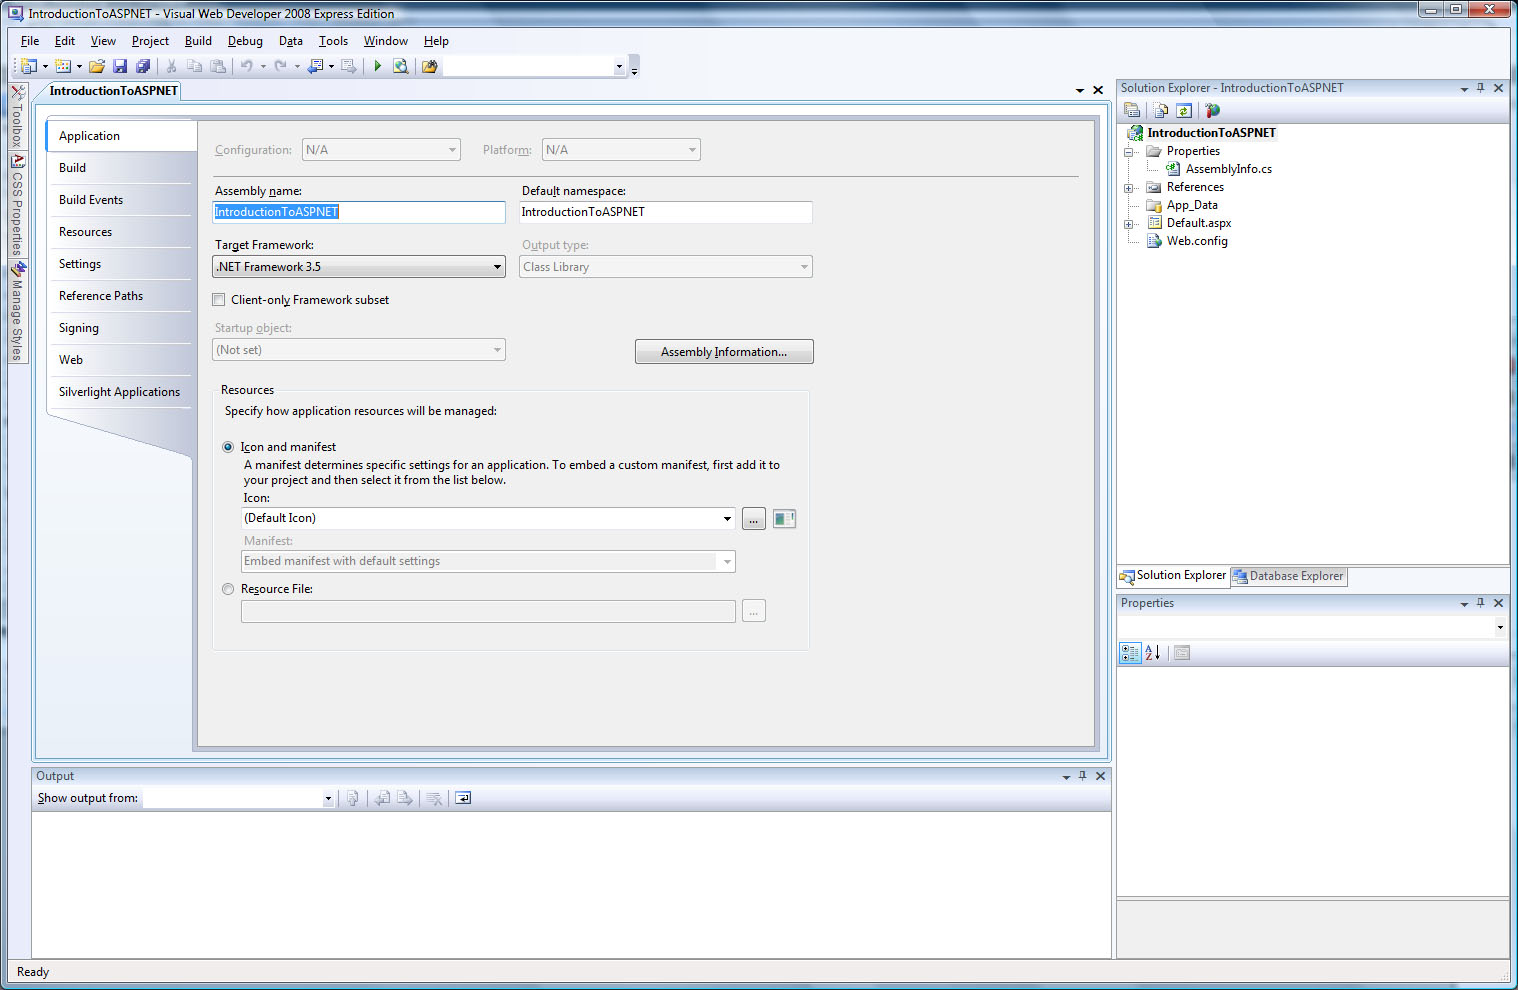
Project properties
The project properties include a lot of settings for your project. We’re not going to go through all of the tabs in properties but you can browse through them to see what’s in there. You’ll probably most need the Application-, Resources- and Web-tabs. Application-tab has some basic information about your project like the default namespace and Assembly name. Web-tab has information about running and debugging the web application. Resources-tab let’s you add new resources to your application.
Next item in Solution Explorer is References. If you open it up, you’ll see a bunch of references already. You probably don’t need all of those and you could remove most of them but it doesn’t matter whether or not you have them in there. So what are these references? They are references to external assemblies. You could create a class in another project and then add it here, and you could start using it in this project. You use third party assemblies the same way. Add a reference to them here and you can use them. If you wonder why something doesn’t work in your application, make sure you have it in references. Especially if it’s not a common library. This time we are happy with the references we have so far so we’ll leave them as they are and move on.
Next item is App_Data -folder. You can totally live without this so you can just remove it. You can use it if you have Access database or a file based SQL server on your project but most of the time you don’t so let’s get rid of it by right clicking it and selecting ‘Delete’. App_Data was a special folder in ASP.NET application. There are other special folders available and you can add them by right-clicking the project and selecting Add | Add ASP.NET Folder. There are a few different special folders available but we are happy the way we are so let them be there.
Ok, then we just have the actual project files. The Default.aspx is the real deal. The long awaited ASP.NET page file but we won’t go there just yet. Let’s first take a look at the file called Web.Config. What is it then? It’s an XML-based configuration file for your ASP.NET application. We can get more deeply into it another time but you can open it to see what it has eaten. For now you only need to know one thing. If you need text based information for your application like some settings, you can use the web.config file for those. The AppSettings-section is for them and you can add name-value pairs into it.
It has already been a long journey and we haven’t even started but now we are ready to dive into the ASPX page file.
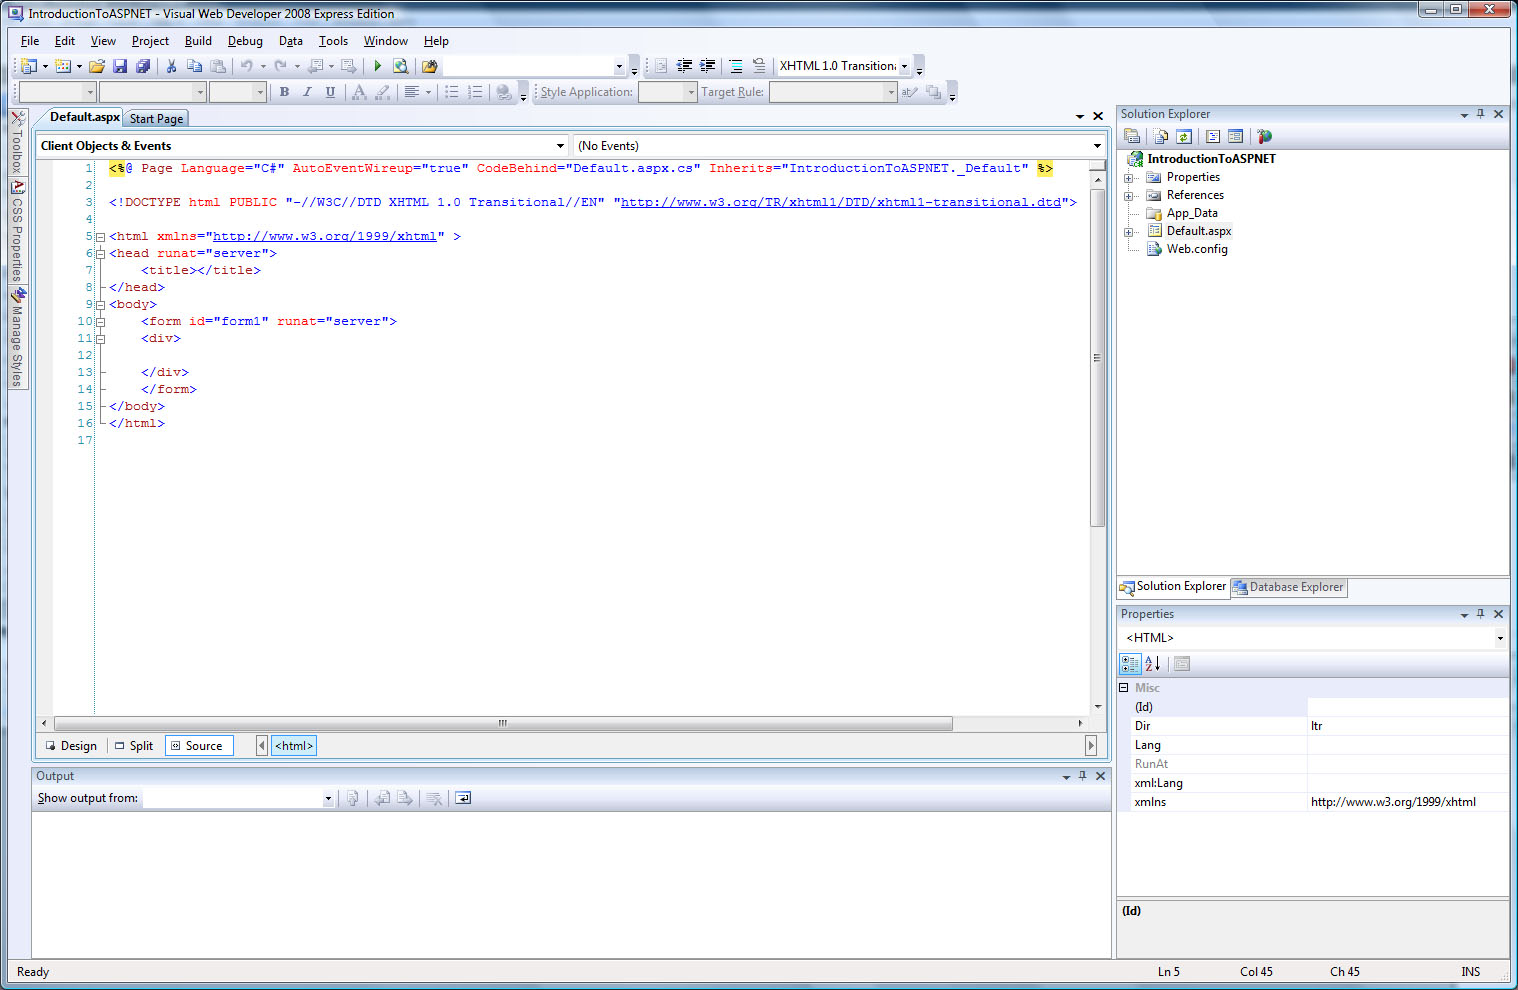
The actual files the users browse with their browsers in ASP.NET are the *.aspx files. You could write the C# code as well as the HTML in the same file but it’s good practice to use the code behind -file which separates the code from the presentation. By default the Visual Studio creates the code behind -file for you as well as the designer file. You can find them by opening the aspx file from the plus-sign.

The ASPX file
The .aspx file is the place for all the HTML-code. That’s the “presentation-layer”.
The .cs-file is where all the C# code is. All the magic happens here and this is probably the file you’ll be working with the most.
The .designer.cs-file is where the designer information is. Usually you don’t have to edit that file directly unless there are some problems. Visual Studio edits this file when you change the page.
You don’t have to double-click the specific file to edit it. You can right-click the Default.aspx-file and select ‘View Code’, ‘View Designer’ or ‘View Markup’, which ever you want. The Designer opens a
WYSIWYG-editor for the ASPX file but you can also do the markup by hand by choosing ‘View Markup’.
The best way to understand how ASP.NET applications work is to do one. Let’s do a simple ‘Hello World’ application now. We’ll be using a button and when you click it, we’ll make some text appear accordingly.
ASP.NET uses things called controls to manipulate the HTML code. Basicly every HTML control (like an input field) has an equivalent in ASP.NET Controls. Of course you can code normal HTML also but when you need to do something with the control in code, it’s recommended that you use an ASP.NET controller.
I said that we use a button and some text changes accordingly in our application. So we’ll need a button- as well as a label control. Label control is just a normal piece of text wrapped inside span-tags. Let’s add these controls into our Default.aspx page. Double-click the Default.aspx file or right-click and choose ‘View Markup’ (you didn’t seriously think we would use the WYSIWTF-editor?) Once you get used to the controls and what properties they have you can hand-code them but for now you can use Visual Studio to help you. There are a few tabs on the left side of the Visual Studio window. One of them is named ‘Toolbox’. Click the toolbox open and you can see a selection of different controls to use in your application.

Toolbox
You can add controls to your page just by dragging them onto it. Let’s drag one label- and one button control to the page.
Both of our new controls have the same attributes: ID, runat and Text. The ID-attribute is the name of the control and must be unique within the page. We use the control’s ID in our code. Let’s change the ID of both controls a little bit.
I’ve added a prefix to my control names so I’ll use the names ‘lblHello’ and ‘btnHello’ for this tutorial. You can use whatever you want as long as they are unique within the page.
The runat=”server” attribute tells the application that the control is a server control and not just a client control. So every ASP.NET control needs a runat=”server” attribute but you can also use the
runat=”server” in other controls like in input-tag to access them from serverside code.
To use that kind of normal HTML tag in the code you can find the correct type from System.Web.UI.HtmlControls.
The last attribute is the text. The text attribute tells what text is shown in the control. In our label control, it’s the text between the span tags and in button control, it’s the value-field.
Let’s change the button’s text-field to ‘Click Me’ and clear the text from the label. We can also remove the whole Text-attribute from the label.
Get prepared for something cool now. Visual Studio has this awesome thing called IntelliSense. To get a glimpse of what it can do, put the cursor behind the last attribute in either of the controls and press space. You’ll get an awesome autocomplete box where you can see everything you can type in there. If you think this is cool, think how cool it is when working with the C# code. It actually can pull all the classes as well as variables, methods, properties and such from any assembly. Welcome to the world where you no longer need to fully type anything.
Before we move on, let’s take a closer look at the aspx file. At the top of the file you can see a strange line of code which starts <%@ Page… This line links the aspx markup file to the code behind -file and defines some other stuff too. You can also use the IntelliSense here to see what else is available. In the future you’ll probably see similar lines like this one which start <%@ Register… These lines register external assemblies for the page so that you can use them in here. For example your own custom user controls have to be registered for the page to enable them.
Our shiny controls don’t do anything yet; the label is empty and the button just has some text. Let’s see how they look in the browser.
Click F5 or the ‘play’-button from the Visual Studio. Visual Studio will compile your application and open it in a browser. Before it will do so, it will ask if you want to enable debugging in it and believe me
you will want to check ‘Modify the Web.Config file to enable debugging and click OK to see how your ASP.NET application looks. Remember that when you deploy your website to a production environment, you’ll want to disable the debugging from the Web.Config file as well as compile the application in Release mode. Nothing you should worry about now though.
Your application is nothing much yet but we’re getting there. As you can see, you don’t need Internet Information Server to develop ASP.NET applications because Visual Web Developer has a built-in Development Server. Click the ‘Stop’-button to leave the debug-mode and return back to the editor.
It’s time to add some C# magic into our application
With PHP you may have controlled the application flow with page loads and parameters or something like that but you need to change your whole thinking and tune in for event driven applications. The whole ASP.NET application is all about events. You can control what happens in various events and you don’t have to worry about a thing.
To make our button do something when you click it, we need to add an event handler for the click action. Simple, isn’t it? This is actually the only shortcoming of Visual Studio. To add a new event handler for a controller we need to visit the oh-so-terrible WYSIWYG-editor. It isn’t so terrible but I’m used to the idea that they all suck so I’ve been avoiding it ever since I met the evil FrontPage. You can add new eventhandlers by hand from the Markup but then you have to manually add them also to your code as well as assign the handler to the event by hand (if you don’t have AutoEventWireup enabled). I think that it’s just too hard so I’ve used the design mode to make it a snap. Click the ‘Design’ button in the lower left corner of the markup area next to the ‘Split’ and ‘Source’ buttons or right-click and choose ‘View in Designer’

Button Properties
In the designer, click the button control and let’s see what we can do here. In the lower right corner, you can see the Properties Window. If it’s not visible select View | Properties Window to get it. At first you can see all the properties you can assign for the control. By scrolling the window you can find the Text and ID properties we already set for the button in markup mode. You can also change the properties from here or add new ones. Type/select a value for an empty property and it will be added to the control.
We don’t need properties now, we need an event handler! To add a new event handler for the button we need to change the mode of the Properties Window.
Click the lightning-icon in the Properties Window to switch the mode for Events. After that you can see all the possible events for the button. We need to locate the ‘Click’-action and assign a new Event Handler for that event. To create the event handler, all you need to do is double click the empty space, right from the word ‘Click’.

Button Event Handlers
Magic happens and you’ll be taken into the code behind -file where you can see the newly created event handler. Now you can start coding stuff into that event handler. But before we go into that, let’s take a closer look at the whole code.
At the top you see a lot of lines starting with Using… The Using-keyword means just that. It gives you a shortcut for the assemblies you use. The classes are wrapped in namespaces which allows you to have multiple classes of the same name but since they are unique within a namespace it’s no problem. When you reference a class, you need to use the namespace also so that the compiler knows exactly what you are using. To make life a bit easier you can define that you are using the following namespaces so you don’t have to write them every time you use them in your code. There are some premade usings but you can add your own as you need them.
Next is the actual class. It’s marked as partial but we don’t go into the C# programming language just yet. Visual Studio uses partial classes so you can add code without the need to recreate the whole source. Then there is the class name and you can see that it inherits the System.Web.UI.Page class which is the base class for all ASP.NET pages.
Inside our class are the event handlers. There’s already a Page Load handler which fires when you load the page into the browser. There’s also the new event handler we just created and that’s what we want to edit now. Add the following code into the btnHello_Click event handler.

Code
Now, let’s check our application again by pressing F5. Click the button and see what happens. In the click event handler we assigned a text to the label control as well as hide the button so that’s exactly what will happen.
I’m going to show you briefly the Visual Studio debugger. Let’s add a breakpoint somewhere. Breakpoints are points in the application where the application pauses. You can then see all the variable values in runtime to pinpoint where the problems are. Click just left of the editing area where there’s a grey bar to create a breakpoint.

Breakpoint
Now hit F5 again to start debugging. The next time you click the button in our application you can see that the application stops when it hits the breakpoint. Now you can press F10 to advance one row at a time. You can also see variable values by hovering your cursor over them. If you hit a method call, you can press F11 to step inside it. Visual Studio debugger is a very powerful tool and don’t hesitate to use it. It will save you time. You can remove the breakpoint by clicking it again. Pressing the Play-icon again let’s you advance normally again until the next breakpoint is hit.
You have just created your first ASP.NET application. It wasn’t much but hopefully it was enough to get you interested. Try different controls and see what they can do. Experiment and ask me if you
have problems. You can also find me and other experts from TheWebSqueeze forums. See you all there!
Nice tutorial. I personally won’t be going into ASP.NET development but I have often wondered how it is structured.
Thanks, was very interesting.
Good article. Nice to see some .Net articles on here.
I’ve never used your approach to event handlers.
In my experience the easiest way to create event handlers for controls is to simply double click the control itself in Design view (i.e. double click the a button to get a Button_Click event handler in the code behind file. In my experience this works for 80% of the events I want to handle. The other 20% of the time I want to setup an event handler for a control’s “non-default” event.
The easiest way handle these case in my opinion is to go to the code behind file of the page, select the control from the drop down list at the top left of the code editor, and then select the appropriate event from the drop down list at the top right of the code editor. Presto, you’ve got an event handler stub.
Cheers!
.NET sucks big time in developing small-medium websites. It is so much quicker with php. It’s difficult to change the default output of .NET’s components which makes styling your website really hard. Also all that unneccessary crap that is generated along with the website. For example elements get id’s like #da7sdgh8as7d8asd6asd8a7sd_GridView$Control and such.
Prove me I’m wrong.
this is very interesting, to go through, i love to lear asp.net more
Will you be doing this regulary?
I found it very interesting and better than the tutorials written by robots from MS.
Let me know – sam@pinkpetrol.com / http://www.pinkpetrol.com