This tutorial is going to teach you how to create a working contact form in asp.net.
First you will need to download and install a version of visual studio or visual web developer. I will be using the latest beta version which you can find here http://msdn.microsoft.com/en-us/vstudio/dd582936.aspx
Alternatively you can use Visual web developer which can be found here http://www.microsoft.com/express/vwd/. The process for creating the form should be pretty much the same in each version.
Now we can create our contact form. Mine is going to collect a first name, last name, email address and comments although feel free to adjust it to suit your own needs.
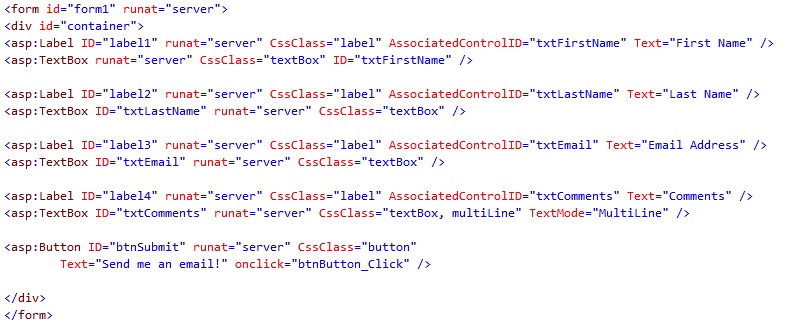
So let’s write our first lines of code which will be our first name label and corresponding textbox. Enter the following lines into the code view of Visual Studio:
<asp:Label ID="label1" runat="server" CssClass="label" AssociatedControlID="txtFirstName" Text="First Name" /> <asp:TextBox runat="server" CssClass="textBox" ID="txtFirstName" />
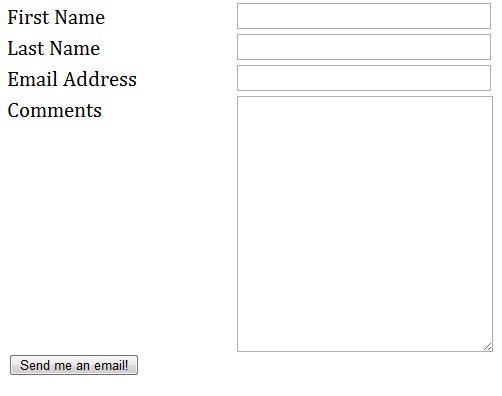
This will leave you with a page looking like this:

You should find that as you start typing, visual studio will try to predict what you are going to want to write and will display a list of available properties and methods to you for specific controls. This is called IntelliSense and can save you lots of time and effort. It is worth looking through the IntelliSense and just seeing what it contains.
The first thing you should notice is that we haven’t used a standard label tag or input tag to function as the forms label and textbox. Instead we have used the label and textbox controls.
What does this mean?
- Firstly, the label & textbox controls are server side controls which means that it is not xhtml. You will have probably noticed this when typing out runat=”server” for each control.
- Secondly, if you build the project (default shortcut key is f5) and view the page source (default right click > view page source) you should see that our label control and our textbox control have rendered slightly differently:

So let’s continue to code up the rest of our form. We can use the same techniques we used before to finish off our form. Enter the following lines below the code you just entered:
<asp:Label ID="label2" runat="server" CssClass="label" AssociatedControlID="txtLastName" Text="Last Name" />
<asp:TextBox ID="txtLastName" runat="server" CssClass="textBox" />
<asp:Label ID="label3" runat="server" CssClass="label" AssociatedControlID="txtEmail" Text="Email Address" />
<asp:TextBox ID="txtEmail" runat="server" CssClass="textBox" />
<asp:Label ID="label4" runat="server" CssClass="label" AssociatedControlID="txtComments" Text="Comments" />
<asp:TextBox ID="txtComments" runat="server" CssClass="textBox, multiLine" TextMode="MultiLine" />
<asp:Button ID="btnSubmit" runat="server" CssClass="button"
Text="Send me an email!" onclick="btnButton_Click" />
As you can see I have added a button control at the bottom and several more form elements to make up our form.
I have also added a new folder to the solution to hold the css to format our form.
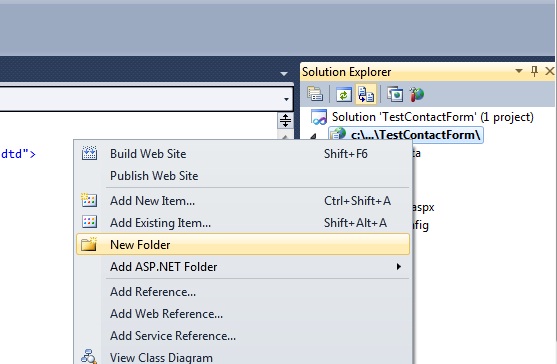
To do this, simply right click the solution explorer and then select new folder and use a similar process to add a new stylesheet to the folder (except this time you need to right click the folder you just created). All the files will be available to download at the end of the article or you can format your own form, yours undoubtedly will look better than mine!
So now what?
Now that we have our form made up and a button to send it on its way what happens? Well now we can dig into the .NET framework with C# a little further. We will start by opening up our code behind file. You can do this by right clicking on the current web form and selecting view code.
This will bring up a page that looks like this.
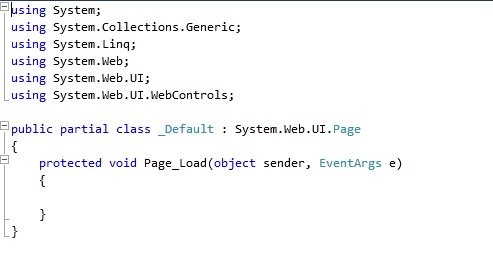
Ok now let’s break this page down as this maybe unfamiliar to you. The first several lines are namespaces in the .NET framework that you currently have access to. A Namespace in short is a container for a particular class in the .NET framework. We can’t send an email using .NET without using the System.Net.Mail namespace so place your cursor after the last semicolon and press enter to begin a new line and enter the following:
Using System.Net.Mail;

You should notice the IntelliSense kick in and present you with your available options as you type.
Now turn your attention to the solution explorer which is located on the right hand side of the page and double click on the web.config file. Scroll to the bottom of this page and just before the last closing element type the following:
<system.net>
<mailSettings>
<smtp deliveryMethod="Network">
<network host="smtp.example.com"/>
</smtp>
</mailSettings>
</system.net>

This configures our asp.net website mail settings. You also need to set up the mail host which typically takes the format like smtp.example.com although this can vary between mail host. For example, mine is in the format of mail.example.com.
All of the above values are examples and should be replaced with the correct values specific to your mailserver.
Your mail server may also require authentication before you can send from it. If this is the case, you will need to add an extra two attributes to the network element as seen below:
<network host=”smpt.example.com” username=”example” password=”Password”/>
After this is done save your changes and close down the web.config file.
All of these settings can also be set in the code behind file. As you are typing you should be able to see them in the IntelliSense, however as we have already set this up in the web.config file we do not need to do the same thing twice.
Now let’s go to the design view of our page and double click on the button. This will automatically generate a button click event. This means that when a user now clicks the button on our webform the code contained inside this event will execute and send us our email:

Now we can type our first couple lines of C# inside the Button Click event handler:
MailMessage objMailMessage = new MailMessage();
objMailMessage.Subject = “Website”;
objMailMessage.Body = txtComments.Text;

In the first line we are saying, let’s create a new instance of the MailMessage class called objMailMessage. This will now serve as a way for us to interact with the MailMessage class which in turn allows us to set a subject and body for our email. The next line is setting properties of the objMailMessage class, in this case our subject, which we can see is of type string:

This really demonstrates again the power of IntelliSense that visual studio provides for you. We now know that the subject needs to be of type string. A string in C# is represented between quotes shown by the text in the brown colour and terminated with a semi colon.
The final line is setting the Body property of the MailMessage class.
![]()
What we are saying here is find the textbox with the ID txtComments and take its text property (which would contain the users message) and place this content into the Body property of our instance of the MailMessage class which we have called objMailMessage.
Ok to finish off our form we just need to add a few more lines of code. For example, where would we like our contact form to go and where should it come from. Enter this line beneath your existing code inside the click event handler:
objMailMessage.From = new MailAddress(txtEmail.Text, “Test From”);
![]()
This basically sets where the email has come from, which will be the email address entered by the user in the textbox and then a from name which is sort of like a masking of the email address in the email client.
The next line we set up where we are going to send our email to. Again, enter the following beneath what you have already:
objMailMessage.To.Add(new MailAddress(example@example.co.uk, “Test To”));
![]()
This line is a bit different from the rest so let’s break it down. So we can send emails to multiple addresses at once, the .To property is a collection. This means we cannot just use the same format as we did for the From address. If you try to write something like this:
![]()
You will generate these errors:

So instead we need to use the add method to add our To email address in:
![]()
The IntelliSense should pop up and tell you what parameters the add method requires as you write it to help you along.
Lastly, we need to instantiate our smpt client in the same way we did our MailMessage class. Enter the following line of code into Visual studio:
SmtpClient objSmtpClient = new SmtpClient();
![]()
We can now use objSmtpClient to call the send method and send our instance of the MailMessage class. You can do this by entering the following line of code:
objSmtpClient.Send(objMailMessage);
![]()
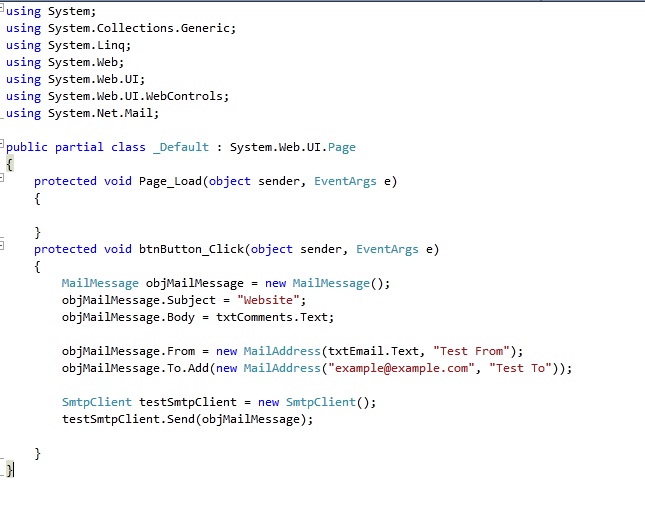
Your final code behind file should look similar to the one below:
Now if you build your website (f5) and click the button you should receive an email. In part two of this tutorial we will add some exception handling to our code and take a look at the validation controls that asp.net offers you.
To learn more about classes and the CLR and the .NET framework in general I would recommend Imars’ excellent book (http://www.amazon.co.uk/Beginning-ASP-NET-3-5-VB-Programmer/dp/047018759X/ref=sr_1_1?ie=UTF8&s=books&qid=1263744575&sr=8-1) which walks you through building a fully functional asp.net website. You can also check out the msdn library which can be invaluable in fixing bugs in your projects: http://msdn.microsoft.com/en-gb/default.aspx
To download the entire code, click here.
Wow… what a long detail tutorial for an email. I’ll be creating “Sending Email With PHP” soon…
I wasn’t sure as to how much detail to go into, hopefully it wasn’t too long and boring!
For a person without any background in .NET, my first impression would be it’s a very long complex tutorial.
Anyway, I’ve bookmarked your tutorial. It might comes in handy later on. Thanks.
You could have written it in 2/3 less space, and only dabble in the less important aspects like creating css folders and the intellisense, rather then the full explanations.
Otherwise, if you strip that down, its a nice tutorial.
as Jeevan M Paran says, If I were a beginner, I would probably navigate away from the page as soon as I saw how long it is.
Good one though!
It’s interesting you both say that as I assumed that a beginner would want to be told step by step what to do. I’ll take it on board for the next one though!
TWS is a magazine for all levels of web designer and developers. If a beginner wanted to tackle this project, I think they’d find it was extremely easy to follow. Skipping steps to make a tutorial shorter is the quickest way to frustrate a visitor.
Email Marketing UK, the powerful, all-in-one email marketing solution. Using our Email Marketing software you can easily create email marketing templates.
http://www.marketingemailuk.com
Photoshop is an amazing tool for altering reality, but it’s only really great when you’re aware of its effects. There are several tools existing to help people detect Photoshopped images. Of them site Photoshopped Image Killer offers the best result. Unlike other forensic analysis tool, pskiller.com analyzes image integrity in the content level, which is more accurate and reliable.