I’ve been thinking about this problem for a while – whenever I pulled a particularly significant quote to display in bigger, bolder text on a page, I duplicated the content. I might have a paragraph, then a blockquote, with a piece of text in. Then I got thinking – I must be able to do this with Javascript – identify which text I need to have as the quote and using the DOM insert it into my content. That way I could avoid duplicate content – which is a must for those using screen-readers.
How?
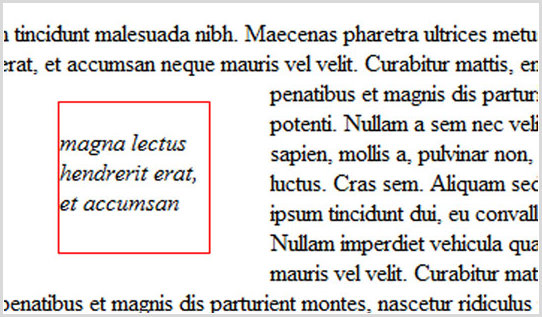
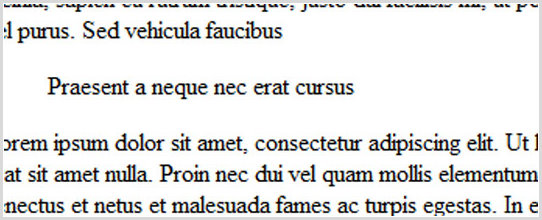
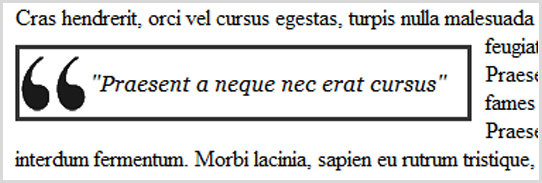
The image below shows you what I’m aiming for – I’m going to add a blockquote and then using CSS, float it so that my paragraph wraps around it. Now I could do it with javascript, but the code could get harder, so why not make it easier. How?
The solution of course, is jQuery. You could use regular javascript, but my main argument is why re-invent the wheel? The jQuery bofs have done all the hard work for you – no point doing it again! Ready? Lets get cracking!
Getting Started
Firstly make sure you have included the jQuery file, and set yourself some text, with the text you want quoted surrounded in a tag.
<p id="par">Lorem ipsum dolor sit amet, consectetur adipiscing elit. Ut lacus massa, ultrices eu, varius sed, feugiat quis, felis. Duis consectetur orci quis ligula. Morbi accumsan augue ut ligula placerat cursus. Mauris cursus erat sit amet nulla. Proin nec dui vel quam mollis elementum. <span class="quote">Praesent a neque nec erat cursus</span> elementum. Phasellus quis orci. Nullam fringilla venenatis risus. Ut eu mauris. Pellentesque habitant morbi tristique senectus et netus et malesuada fames ac turpis egestas. In egestas. Phasellus quis turpis at tortor interdum fermentum. Morbi lacinia, sapien eu rutrum tristique, justo dui facilisis mi, ut porttitor quam ipsum ut arcu. Praesent lobortis. Cras hendrerit, orci vel cursus egestas, turpis nulla malesuada nibh, in lobortis diam magna sed justo. Ut vel purus. Sed vehicula faucibus</p>
So, what do we need to do? Firstly, we need to get the text enclosed in our span tag we created, with the class of “quote”. Secondly, we need to insert a blockquote containing that text at the end of the paragraph. After all that, we’ll look at adding a couple more features to make our quotes even better.
Selecting the Text
Before we do anything we need to tell jQuery to hang fire until the window is ready – like the onload event for normal javascript. It’s really easy code and makes sure our javascript only runs when the browser is happy to let it do so. Then we can select the correct span.
jQuery has got to have the easiest selection methods ever – it uses CSS selectors to select elements, if you know your CSS you can select an element using jQuery. The code for selecting the span with the class of “quote” looks like this:
$(document).ready(function () {
$("span.quote")
});
Getting the Content
Great, so we’ve selected our span tag. Now however, we need to actually get the contents of it so we can add it to our page. This can be done via a jQuery function, text() which gets the text of the selected element. Then, so we can store the text for usage, we assign it to a variable. It’s all really simple and easy to understand – and this to your selection to end up with this line:
var quotetxt = $("span.quote").text();
Bringing our Blockquote together
So now the variable quotetxt contains the text we need to put into our blockquote we can bring it all together. What I like to do is create another variable – this one that holds the entire blockquote – the html tags, the text and everything, so when we come to insert it, we are just adding one variable, personally it makes for eeasier reading, I think. I’m going to call my variable “thequote”. I’m also going to give the blockquote a class of “quoted” so we can style it with CSS. The line looks like below, please note how I’m escaping the quotes I need to add by placing a back-slash in front of them.
var thequote = "<blockquote class="quoted">" + quotetxt + "</blockquote>";
Inserting our blockquote
Now we need to add the blockquote after our paragraph. Lucky for us, jQuery makes this really easy to with a function called after(), which takes one argument, the text to insert. We need to tell the function the element to insert our text after, which is my paragraph tag:
$("p#par").after(thequote);
And hopefully now you might have something like this:
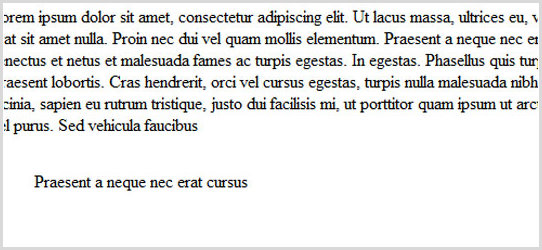
Not quite right
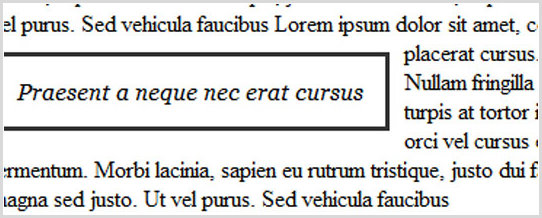
To get the full effect you should add another parapgraph right after our first one, and you get a look like this:
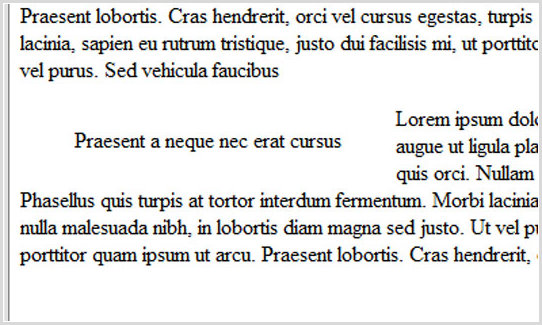
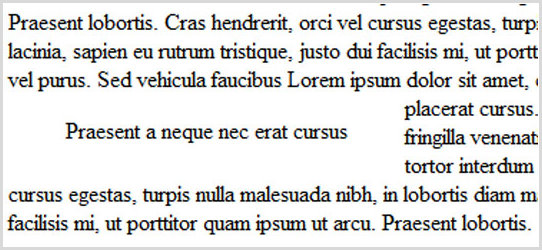
Because the parapraph is doing what it normally does – as it is a block element – it wont start from the end of the first paragraph, which leads our page to look, in my opinion not quite right. However, if we were to make the two paragraphs before and after our blockquote display inline, they will line up and create something more like this – which is what we want:
We could just give both paragraphs a class and do it with CSS – but that means if you add another quote you need to give those paragraphs the same class. Or, which is my prefered way, we can select the paragraphs with some fancy jQuery selectors, and set css properties using the jQuery function css(). You remember we gave our first paragraph an id of “par” (yours might be different), so we could insert our quote after the paragraph. So we know we can select the first paragraph, and make it display inline like so:
$("p#par").css("display", "inline");
The function css() takes two arguments, the css property and the value to set that property. So here I am getting the display property, and setting it to “inline”.
Ok, but how to now select the paragraph that is after the blockquote? We don’t want to give this one an id, so we need to figure out how to select it, and jQuery, as I mentioned previously, as a super way of doing so. First we need to select the element that is before the one we are selecting, so in our case it’s the blockquote. We then need to tell the browser to find all the paragraphs that come after a blockquote in the code. You do so like this:
$("blockquote + p").css("display", "inline");
So all we are doing is saying “Find all paragraph tags that are after a blockquote.” It’s that easy! Then once again I’m just setting the css property like we did before. Now your page should look like this. The paragraphs are only not displaying inline properly because of that big fat blockquote blocking our way – better get some CSS going to fix it!
Style!
Now we get to the style part – we gave the blockquote a class of “quoted” earlier, so now we can style it. First I’m going to float it left, so the two paragraphs will wrap round. I’m also just playing around with borders and fonts to make the quote stand out.
.quoted {
	float: left;
	border: 3px solid #333;
	font-family: Georgia, "Times New Roman", Times, serif;
	font-size: 16px;
	padding: 15px;
	font-style: italic;
	margin: 10px 10px 10px 0;
 }
There you have it – a nice blockquote with jQuery!
Quick Review
Our basic blockquote code is now done, and this is how our jQuery code has shaped up:
$(document).ready(function () {
var quotetxt = $("span.quote").text();
var thequote = "<blockquote class="quoted">" + quotetxt + "</blockquote>";
$("p#par").after(thequote);
$("p#par").css("display", "inline");
$("blockquote + p").css("display", "inline");
});
Extra Number 1 – Speech Marks
Now we’ve done that, I’m going to look at adding a couple more features to spruce up your blockquotes. Firstly, often quotes come with speech marks, right? So let’s add that in. Now we could, when creating the variable thequote, which looks like this right now:
var thequote = "<blockquote class="quoted">" + quotetxt + "</blockquote>";
Just adding a speech mark before the
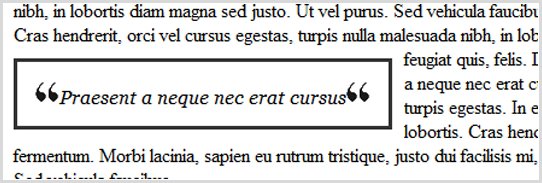
and before the end tag would fix it – but that leaves little customisation! What if we wanted an image of a speech mark, and wanted to add that? What I suggest is making two more variables, opensmark and closesmark, which will contain the values of the speech mark to go before our quote, and the one to come at the end. I’ve found an image on the net to use as my quotation mark, but feel free to make your own or use a different one. It’s 20px x 20px.
So, lets create our variables:
var opensmark = &quote;<img src="speechmark.gif" alt="Speech Mark" />"; var closesmark = $quote;<img src="speechmark.gif" alt="Speech Mark" />";And now we can add them to the variable like so:
var thequote = "<blockquote class="quoted">" + opensmark + quotetxt + closesmark + "</blockquote >";And vola! Here is how it looks:
Pretty nifty eh? Another idea would be to have a different speech mark at either end, or just use one. I will leave you to experiment!
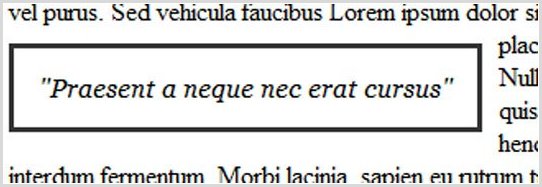
Just with Normal Speech Marks
We can use the same technique to add normal speech marks, just by changing the values of the two variables:
var opensmark = """;
var closesmark = """;
Speech Marks with CSS
An effect I also like is when you just have one speech mark set as the background image for the blockquote, and we can do that with some easy CSS. I’ve used the same image but now it’s 50px x 50px so the effect is nicer. To add this image, I’ve had to update the padding, this pushes the text left from the left-border by 50px (the width of the speech mark image) so the text does not display above the image, as it’s un-readable.
.quoted {
	float: left;
	border: 3px solid #333;
	font-family: Georgia, "Times New Roman", Times, serif;
	font-size: 16px;
	padding: 15px 15px 15px 50px;
	font-style: italic;
	margin: 10px 10px 10px 0;
       background: url(/web-design-tutorials/speechmark_big.gif) no-repeat;
 }
Getting the Source
Often quotes will not be by the author – by a famous person, or someone the author finds inspirational. We need to credit the quote to the person who spoke it, so lets see if we can add this information in our quote.
The best way is to store the information in the title attribute of the
like so:elementum. <span class="quote" title="Mr Loren I Psum">Praesent a neque nec erat cursus</span>What's the Title?
Now using jQuery we can access the value of the title attribute via the attr() function. This is done like so (I'm also saving the value to a variable for later use):
var person = $("span.quote").attr("title");What we now need to decide is how to add this information to our quote and I think the easiest way of doing so is simply adding the text: "Source: Mr Loren I Psum" at the end of our blockquote, maybe in a different style so it's distinguishable. Like the variable thequote, I'm going to save all the source information in a variable called thesrc:
var thesrc = "<span class="source">" + person + "</span>";I've given the span a class, so we can style it with CSS, and now all that remains is to add it to our blockquote:
var thequote = "<blockquote class="quoted">" + opensmark + quotetxt + closesmark + thesrc + "</blockquote>";Style the Title
If you look at your quote now, you will see the source is exactly the same style as the quote, which is not good, so here is the css which I've used:
.source {
	display: block;
	font-size: 13px;
	font-weight: bold;
	margin: 0 0 0 5px;
}
All Done!
That's it! Here is my final javascript code, incase you lost track:
$(document).ready(function () { var quotetxt = $("span.quote").text(); var opensmark = """; var closesmark = """; var person = $("span.quote").attr("title"); var thesrc = "<span class="source">" + person + "</span>"; var thequote = "<blockquote class="quoted">" + opensmark + quotetxt + closesmark + thesrc + "</blockquote>"; $("p#par").after(thequote); $("p#par").css("display", "inline"); $("blockquote + p").css("display", "inline"); });Now it's up to you to see how you can make your blockquotes look. I'm also working on a jQuery plugin, jQuote, which should make this whole process easier, but that's in the very early stages. Thanks for reading. As usual, any questions or problems, leave a comment here and I will do my best to help out!

Thanks for the nice tutorial! The blockquote element is perfectly suited to marking up such quotations.
Good detailed tutorial. Nice job
Thanks guys, nice to see you enjoyed it. If you have any suggestions on future tutorials, I would love to see them!
Hey all!
I’ve created a jQuery plugin called jQuote that does all of this for you and makes it even easier!
http://www.jackfranklin.co.uk/jquote
Great tutorial and very helpful for someone new to jQuery! I would offer one suggestion: rather than using simple keyboard quote marks, it would be typographically and (IMO) semantically correct to use the HTML values for opening and closing quotes ampersand#147; and ampersand#148; respectively. Small detail but one my typography professor hammered over and over during college.
Thanks Trevor, and you have a very valid point. Thanks.
Great that you came up with this tutorial, this is really solution, I’ll bookmark this for later use, when i’ll get the same problem, thanks!
One problem: this isn’t a block-quote you’re trying to make, it’s a pull-quote. Block quotes are used when large blocks of text, usually several paragraphs, are quoted from a single source. Pull quotes are short quotes usually from the article itself that are pulled to the side to draw the reader to that portion of the text.
More information: http://xhtml.com/en/xhtml/reference/blockquote/
Ryan,
Since you’re so keen on enlightening us with your useless information, perhaps you could point us to a page describing the pull-quote html tag.
OH WAIT!! There isn’t one, because it doesn’t exist.
Sometimes we use the closest tag to the one we need. Deal with it.
Peace.
nice job mate
Sam
codingmagician.com
Groan… for once my tags weren’t filtered … lets try that again?
Eric,
There is something to be said for Ryan’s comment. Not that you need to use the ‘pull quote’ tag but rather that you need to use the right tags.
In this case, it would be better to use a <q> tag since that would correctly indicate the the text is a quote and the classname “pull” (or aside or what-ever-you-want-that-is-meaningful) will give you the necessary hooks to do this. Further, if the quote does belong in the content, then this is the best way to do it as the quote should be indicated as such. </q>
In addition, indicating the source in a title is also not correct; this is what the cite tag is for. Sticking the cite tag in the q would work in some cases, if that’s what the content calls for but if your sentence is something like:
As <cite>Harry S. Truman</cite> said, <q>The buck stops here.</q> (from the HTML4 description of <cite>) </cite>
then you need something more explicit to associate the cite and the q. Since all browsers allow arbitrary attributes, I would reuse an existing attribute, namely for and write that as:
As <cite>Harry S. Truman</cite> said, <q>The buck stops here.</q>
The jQuery selectors are a little more involved but this makes good use of the semantics already in HTML to get its stuff done.
Love it, also great detail in the tutorial thanks !