The most effective way of managing your website or blog is to be able to perform, update, troubleshooting for errors and optimizing images, codes and scripts in an efficient way. What I do with all the websites that I design and maintain is to have all that process done locally on my PC instead of directly from the hosting server. Not only is the access time faster and convenient, you can also do thorough testing of your website before putting them live online. For that, I created this tutorial on “How to install WordPress locally in Windows XP”.
Requirements
Before we start, lets check to see what the basic requirements are that we need for this tutorial?
- Windows Operating System (preferably Windows XP – it is what is used in this tutorial)
- WordPress
- Wamp Server
- FTP Client
Setting up WampServer
The great thing about WampServer is it makes our job easier by installing Apache server, MySQL database and PHP all at the same time. Don’t worry about installing or how these will interact with each other.
- Download the latest version of Wamp Server- as of this writing it is of Version 2.0i. (Approximately 16 MB)
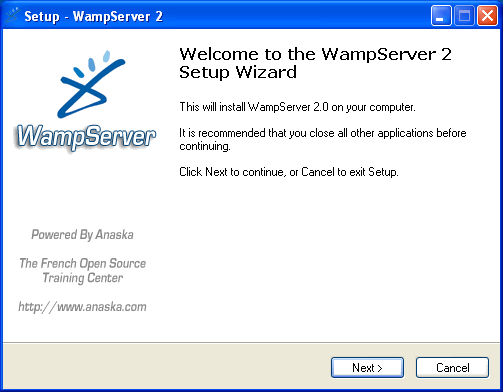
- Run the setup process by double clicking the downloaded WampServer2.0i.exe file.
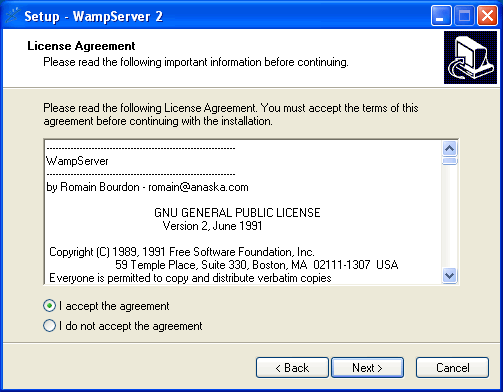
- Click on “Next” and check the radio selection “I accept the agreement” and press “Next”.
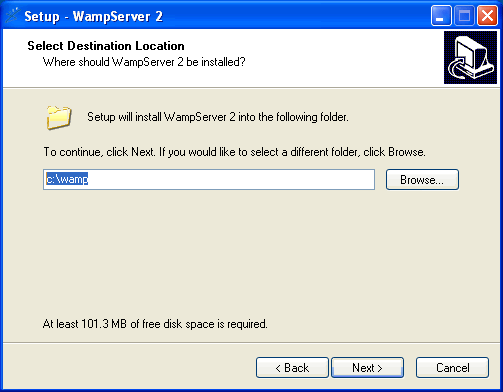
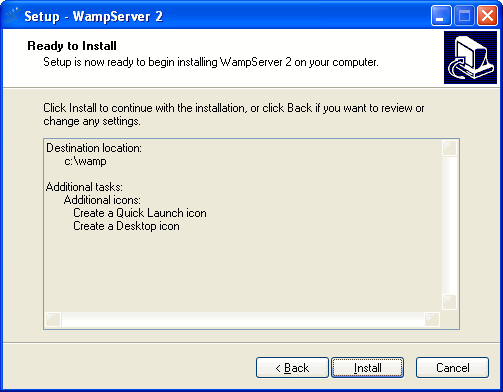
- The default path for WampServer is “C:wamp“. You can change it if you want by clicking the “Browse” button but I do suggest you leave this in the default setting and press “Next“.
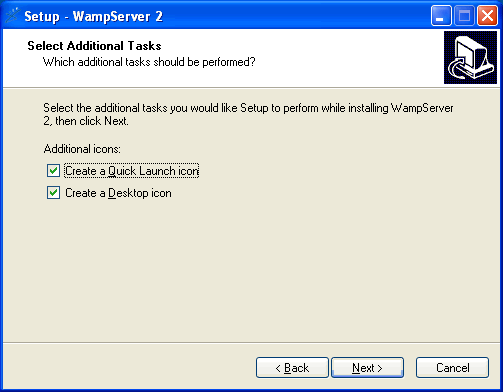
- Select both “Create a Quick Launch Icon” and “Create a Desktop Icon” and press “Next“.
- Click “Install” to begin with the installation.
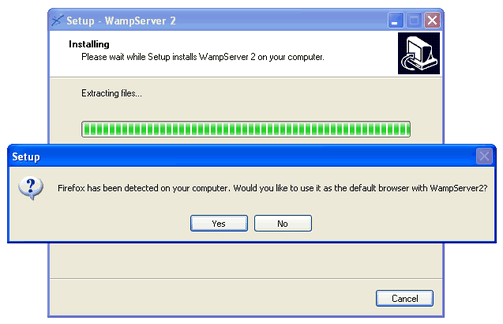
- A popup box will appear and ask you to choose your default browser. Please choose your default browser to which the wamp server will be associated. I do suggest that you use Mozilla Firefox as there are so many plugins that you can add to this browser to make your programming world become more interesting and efficient. Click “Yes” to continue.
- “Unblock” the Windows Security Alert if it asks you.
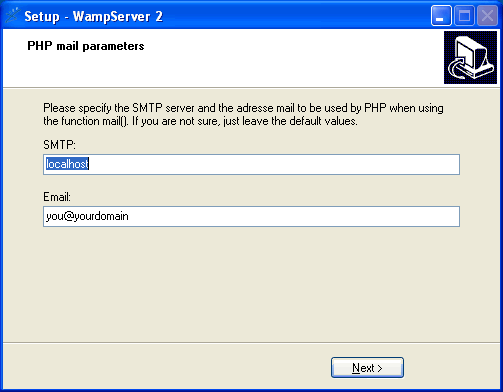
- Just leave the default values as such for the “PHP Mail Parameters” and click “Next“.
- Click “Finish” to exit the setup (Make sure that the “Launch WampServer 2 now” option is checked)
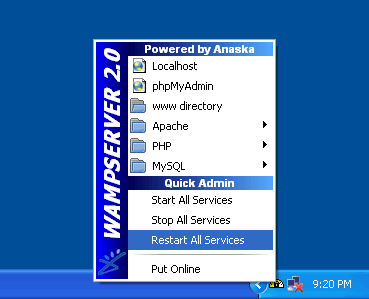
- Now you will see a “speedometer- like icon” on the notification area of the taskbar (beside your taskbar clock).
- Just wait until the speedometer is fully white (Represents its fully ready).
- If your WampServer is fully ready, you can skip the next step and continue reading “Setting Up phpMyAdmin“.
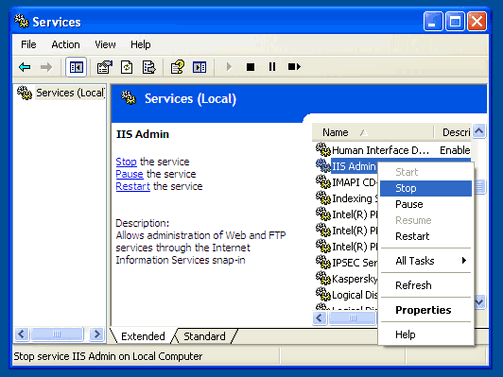
- If it is not, that means some other server service is running in the background and the service with WampServer is clashing. Most probably you have windows web server (Internet Information Services – IIS) running at the time of the WampServer installation. To solve this, we need to stop the IIS. Same things goes if you want to start IIS services, you must stop the WampServer services.
- To stop the IIS service, go to Start > Run > and type services.msc and hit the enter button. This will opens up a services control panel.
- On your right hand side, navigate and find a service called “IIS Admin“. Right click on it and select “Stop“. This will stop the IIS services.
- Now you can restart your WampServer services by single clicking on the WampServer icon, and select “Restart All Services“.
- You can now see your speedometer-like icon is a full white color (Represents its fully ready).
- Your Wampserver is now ready.


Setting Up phpMyAdmin
Setting up your database password
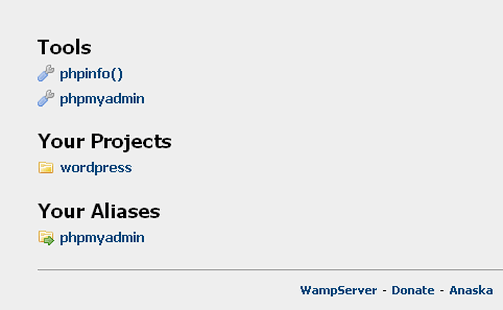
- Single click on the WampServer icon, and select phpMyAdmin.
- Select “Privileges” from the top menu.
- For experimental purposes, we will use the default user i.e. root/localhost.
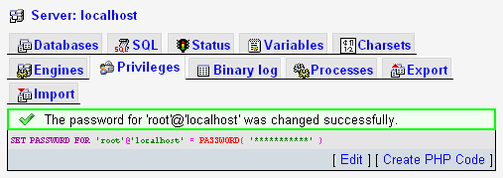
- Click on the edit privileges button for the user “root” with the “localhost” host. This will open up the “Global privileges” setting and navigate to the “Change password” portion.
- Type in your preferred password and again to conform them. Click the “Go” button to apply the changes.
- You have successfully set a password for your MySQL database. In order for you to access your database, you will need to supply/remember this password.


Setting up phpMyAdmin configuration setting
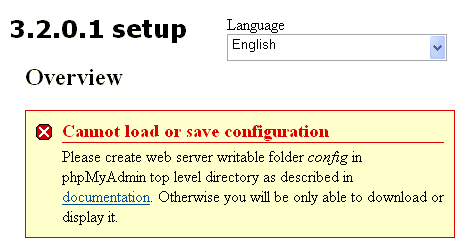
- Once you have setup your database password, we need to enter this information into phpMyAdmin as well. We do that by single clicking the WampServer icon and selecting phpMyAdmin, but you will get the following error.
- Before we do that, we need to create a folder named “config” in phpMyAdmin top level directory (C:wampappsphpmyadmin3.2.0.1config)
- Once that folder is ready, navigate to: http://localhost/phpmyadmin/setup/ in your browser.
- The page will inform you that “There are no configured servers” and ask you to create a new server. Click on the “Create Server” button.
- This will bring you to the “Add New Server” configuration page. If you are not in the “Basic settings” menu, then select “Basic settings” from the top menu.
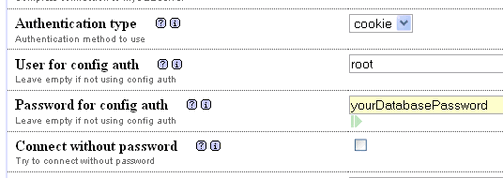
- Don’t bother about other things on the form. We just need to set our database password that we created earlier in this tutorial. Find a field named “Password for config auth” and throw in your password in that field and click the save button.
- This will bring you to the page where the config file will be automatically generated (in your C:wampappsphpmyadmin3.2.0.1config) but first, you have to make sure you click the save button again to make sure the config file generated successfully.
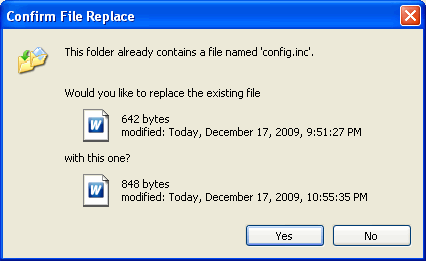
- Once you have saved it, go into your config folder that you created earlier (C:wampappsphpmyadmin3.2.0.1config). There you will see a file named “config.inc“. What we are going to do with this file is to copy and paste it into our phpmyadmin root directory (C:wampappsphpmyadmin3.2.0.1). This will override the existing file on that directory. Just click “Yes” to replace them.
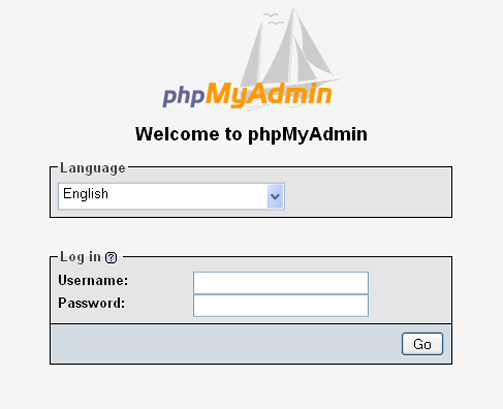
- All right… we are almost there! Now let’s test our phpmyadmin. Single click on the WampServer icon, and select phpmyadmin. If you can see the phpmyadmin login page, that means you have successfully setup your phpmyadmin. Congratulation! You can now login with the username: root with your password.
- Attention! For safety and security reasons, you need to delete the folder “config” (C:wampappsphpmyadmin3.2.0.1config) that we created earlier. Just delete the entire folder as it will do you no harm. Go ahead and delete them.
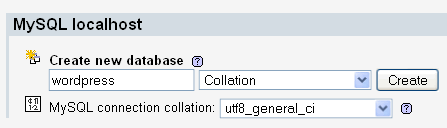
- The next step is setting up WordPress but before we do that, we need to prepare the database that will be used by WordPress. Let’s create a database called “wordpress”, and don’t bother about the table creation because WordPress will automatically create that for you in the WordPress setup process.
- Ok, we are officially finished with WampServer and phpMyAdmin. Now it is time for us to run the “famous five minute WordPress installation” process. Yes, you’ve heard me! It takes only five minute of your time to install them.


Setting up WordPress
- Download the latest stable copy of WordPress (As of this writing it is WordPress 2.8.6)
- After downloading, extract the files.
- Copy and paste the WordPress folder into your www folder (C:wampwww).
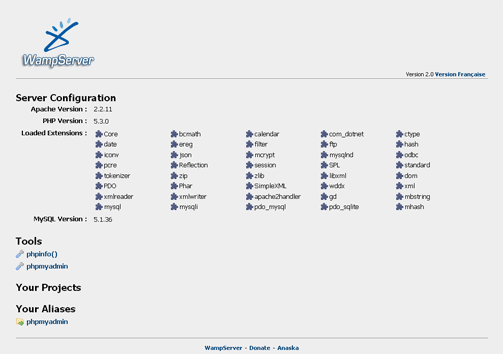
- Now, single click on the WampServer icon, and select localhost, or you could manually type this address in your browser address bar: http://localhost/
- As you can see, you have a new project called wordpress (which is the extracted wordpress folder that we copied and pasted earlier). If you have more than one project inside the www folder, it will be listed here as well. So it is advisable to create a new folder for each of your projects for easy management.
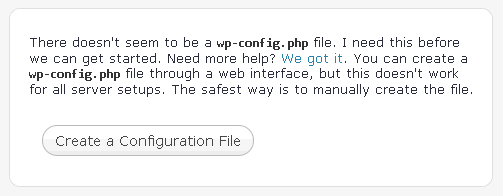
- Click on the “wordpress” project under “Your Projects” in order for us to continue with our wordpress setup. This will bring us to creating our wordpress configuration file.
- Click on “Create a configuration file” and then click on “Let’s Go“.
- Enter the value of database name, username and password (which you gave before in the PhpmyAdmin)
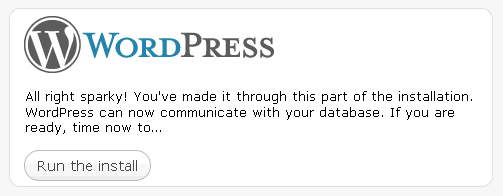
- Please remember the database name is the one that we created earlier which is “wordpress” and the username is “root” which is the default user for MySQL database. Don’t touch the “Database Host” and “Table Prefix“. Leave it as such and press “Submit“.
- Now click on “Run the Install“.
- Enter your blog title and e-mail. No need to select the box which says “Allow my blog to appear in search engines like Google and Technorati” since this is a local install.
- Now click on “Install WordPress“.
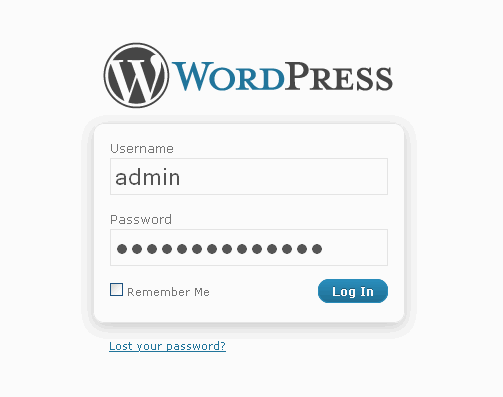
- Note that password carefully! It is a random password that was generated for you. We will change this later on in the next step by logging in with the information given.
- Now log into WordPress using the username “admin” and the password you got from the previous step.(don’t select “remember me“, because we are going to change this password later on)
- Now you will see a reminder notice to change your password as below.
- Now click on “Yes, Take me to the Profile Page“.
- Here you can choose your own password (all the way down the form) along with color schemes, display names, email addresses, website addresses, biographies and many more. Once you have updated this information, click “update profile“.
- Now you can use this WordPress Installation same as the one you have online.
- You can write posts, install themes, test-drive plugins and most probably everything you can do in this local install of WordPress.
- Enjoy blooging!


File Synchronization
Now you have the updated version of your website/wordpress blog in your localhost. It is time for you to synchronize them with the online version.
You could do that in various way, but the most effective, user-friendly way that I have found so far is by using FTP (provided you have web hosting that will allow FTP connection).
We are going to use the most popular FTP application amongst web designer/developer, so far as I know, which is FileZilla (Client).
- Install FileZilla by double clicking the downloaded exe file. After successfully installing it, we need to do a
little configuration in order for us to establish a connection to our FTP account/hosting site. We do that by going to File >
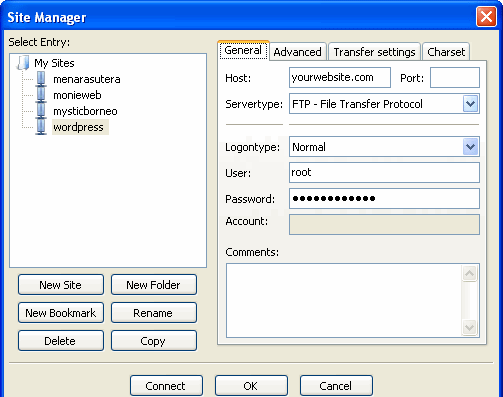
Site Manager. This will open a “Site Manager” popup window setting. - Click on the “New Site” button and name your connection “WordPress” or whatever you like. On the right hand side,
click on the “General” tab and put in your website information (Host, Logontype – set to normal, User and Password).
Once done, click on the “Ok” button to save the configuration or “Connect” to start connecting to your FTP account.
You can connect to your FTP account manually by going to the file menu and again selecting File > Site Manager, select your
connection and click on the “Connect” button. - As you can see, the window is divided into two sections, left and right. Left column represents your local computer
(localhost) and the right column represents your remote site (Hosting). All you need to do is drag your files from the left
column to the right column and your file synchronization process is finished.

Bonus – Why aren’t my Permalinks working?
- You probably used Permalinks, aka PreetyURLs, in your online version of your wordpress. (To learn more on PreetyURLs, I have created a tutorial specifically for learning basic htaccess. Click here to learn). Normally, this feature is automatically enabled by most web hosting but not local WampServer. In order for you to make sure the offline version of your wordpress (localhost) is functioning exactly like your online version of your wordpress, then this is the simple configuration that you should make into your Apache “httpd.conf” file.
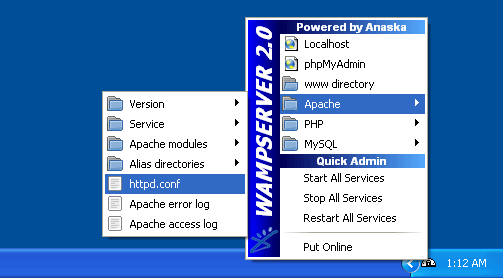
- Single click on the WampServer icon, and select Apache > httpd.conf (This is the main Apache HTTP server configuration file. It contains the configuration directives that give the server its instructions)
- The file will be opened up in txt format (notepad). We need to make sure that mod_rewrite is enabled. We do this by searching for the text “mod_rewrite” or you can directly find this line of code: “LoadModule rewrite_module modules/mod_rewrite.so“.
- At the moment, this line is commented and we need to throw away the commenting symbol which is “#” in order for our PreetyURLs to be working. Uncomment the line, save the file, restart all the WampServer services and we are done!
What a brilliant, clear and well written article. I have followed your instructions and have setup a fully functioning WampServer!
I must say not having used WAMP before im most impressed by how easy it is to use, have used XAMPP in the past but didn’t get on with it. Will be using WAMP from now on
Thanks again for your brilliant tutorial.
Just thought that I would point out that there is discussion going on in the forum about WAMP vrs XAMPP, so if you’ve used both, or have a preference, we’d love to hear about it!
http://www.thewebsqueeze.com/forum/Squeeze-Bar-f3/Install-Wordpress-Locally-In-Windows-Xp-with-Wa-t5959.html
_________________________________
As far as the article goes! Great work Monie, I certainly can’t wait to give WAMP a try to see how it works! Thanks for the useful guide!
A quick google teach me this:
XAMPP comes with Perl, hence the extra P, if you are going to use Perl go with XAMPP, if Perl isn’t part of your agenda then go with WAMP.
Thanks for teaching me all about Wamp
Great efforrt.
I am currently using XAMPP.
After reading this article, I started to follow every single step of your tutorial and managed successfully to install them.
I hav eto say that I liked WAMP more that XAMPP.
Thanks Monie.
Just in time. Thanks.
Thank you for this article! It was so clear and easy to follow and helped me so much. I will definitely pass this on to my friends!
This tutorial was fantastic! I had tried to install wamp and wordpress earlier but I couldn’t get phpAdmin to connect properly.
I assume that you’ve successfully install them and managed to connect to your phpmyadmin too, right? Glad to help.
while adding data from mysqlwamp to vb i couldnt update the data. it shows that file is read only. how could i update in vb.
Hai Siva, did you manage to solve the issue?
Could you elaborate your question a bit more detail, or perhaps you could post a question in the forum. I bet, a lot of people in here will help you.
Error
MySQL said: Documentation
#1045 – Access denied for user ‘root’@'localhost’ (using password: NO)
phpMyAdmin tried to connect to the MySQL server, and the server rejected the connection. You should check the host, username and password in your configuration and make sure that they correspond to the information given by the administrator of the MySQL server.
Thats after I changed the password and tried to use phpMyAdmin
Thanks I appreciated the work you put into this.
Excellent article – got me up and running in no time. Thank you!
I have installed wampserver following your instructions but when I try to open phpmyadmin the page is blank, can you help?
In that case, you have to repeat this step: “Setting up phpMyAdmin configuration setting”
Thanks for this guide, up and running in 10 mins. Very detailed and covered every step.
I have followed this tutorial twice now and I also get the error:
#1045 – Access denied for user ‘root’@’localhost’ (using password: NO)
I will try it a third time. Hopefully it is user error on my part.
But I am beginning to think maybe there is something missing from the tutorial, or something changed in wamp download, or maybe something about my computer.
Any help would be appreciated.
Hi,
I have installed wordpress just like you have mentioned, i have also copied the wordpress database into my local database and replaced all the references of my live blog’s URL with the localhost equivalent. Home page loads great, and any link i click after that is broken… do you have any suggestions? i have the apache re-write module turned on so thats not the problem