Subversion (also referred to as SVN) is an open-source revision control system. Subversion tracks changes to files and folders, and keeps copies of all revisions, or versions, of your files and folders. Subversion allows you to retrieve at any time older versions of your files and folder. And because subversions keeps copies of all revisions of your files separate from the copy you’re currently working with, there’s an element of a backup system to it. Subversion can work across a network, with more than one user as well, and can help manage the situation where many users may be modifying the same file. Subversion can help manage any conflicts that may arise when more than one users makes changes to the same file.
For this tutorial we are going to start with the basics. We will assume that there is only one user, and we won’t deal with Subversion being used across a network. We are also going to focus on one particular Subversion program, TortoiseSVN. TortoiseSVN is an open-source Windows implementation of a Subversion client program.
First things first, let’s define some basic Subversion terminology:
- Repository: This is the central location where Subversion maintain all the information about all the different copies of your files and folders.
- Working Copy: This is the copy of your files and folders that you work with. You can have any number of Working Copies for one Repository, though normally each user would only need one Working Copy (per computer, anyway).
- Import: This is what you do to initially include existing files into your Subversion repository.
- Check Out: This is how you would create a new Working Copy from an existing Repository.
- Update: You would do an Update on an existing Working Copy to make sure it contains the latest versions of the files and folders from the Repository.
- Commit: When you make changes to files in your Working Copy, Commit will push those changes into the Repository.
We will go through each of these in detail later in this tutorial.
Getting and Installing TortoiseSVN
You can download TortoiseSVN from the TortoiseSVN site. Double-click the downloaded file to begin the installation. The installation process itself is quite straightforward. Once the installation is done, you will need to restart your computer because TortoiseSVN integrates itself into Windows Explorer (not Internet Explorer). There is no TortoiseSVN “program”. You access all of TortoiseSVN’s functionality via the right-click menu on files and folders on your computer.
Once you’ve installed TortoiseSVN and rebooted your computer we can move on and create our first repository.
Creating a Repository
The repository is the central location where Subversion keeps information about all the versions of the files and folders you will keep until version control. You can create the repository somewhere on the same hard disk that you will work on, but I would recommend keeping it on a separate disk because that way you get the added benefit being protected if one of your hard disks fails. The ultimate place to put your files is on another computer in another part of the country (or of the world), but that is beyond the scope of this tutorial. For this tutorial, I will create the repository on my E: drive and I will work with my files on the C: drive.
On the E: drive I created a new folder, “SVN Repository”. You can call it whatever you like.

I then right-click on the “SVN Repository” folder, and from the context menu select “TortoiseSVN” > “Create repository here”.
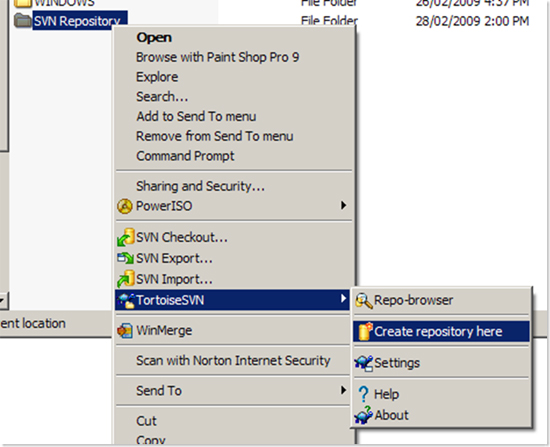
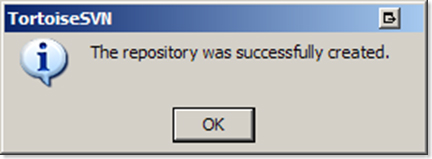
You should see a message stating that the repository was successfully created.
If you look inside the “SVN repository” folder you’ll see that a bunch of files and sub-folders were created. Don’t worry too much about the contents, you should never really have to worry about the repository folder again, except perhaps if you want to include the whole folder in your backup routine. All you need to know about the repository is where it is, in my case “E:SVN Repository”.
Adding Existing Files into a New Subversion Repository
Let say that on my C: drive I have a folder, “Project X” that contains a number of files related to a project I am working on.
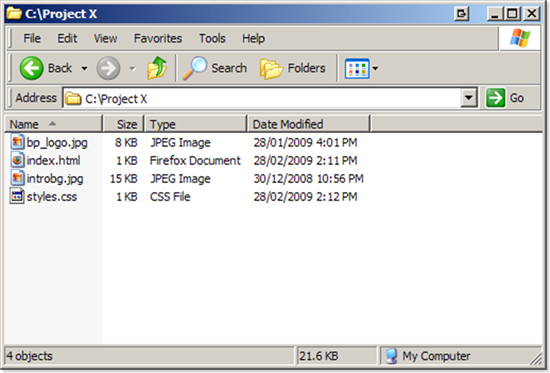
I want to import these files into my Subversion repository so that I can track changes to them. To do this I need to Import them into Subversion. I will go up one folder level and right-click on the “Project X” folders and select “SVN Import” from the context menu. You may need to select “TortoiseSVN” > “SVN Import”. Which SVN commands appear directly on the context menu versus on the TortoiseSVN sub-menu is configurable.

In the resulting dialog window I enter File:///E:/SVN Repository as the URL of my repository. This is the path to the repository I created earlier in the tutorial. If I had a repository out on the Internet, my URL might start with http:// instead of file:/// (note, there are 3 slashes).
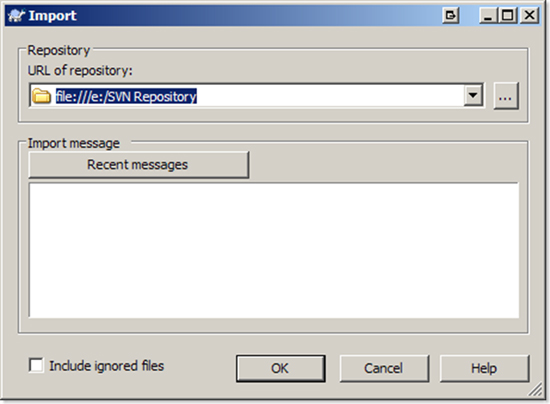
Click the “…” button to browse the contents of the given repository. This allows you to choose where in the repository you want to import your files.
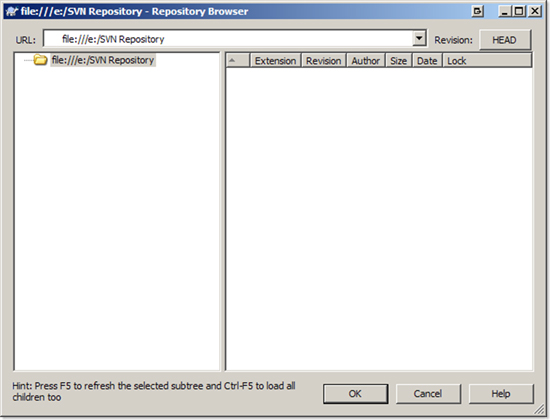
As you can see below, my repository is empty. If I were to leave the URL as shown, the 4 files in my “Project X” folder would be imported directly into the root of the repository. You can have one project per repository, or you can place several projects in a repository. I will have several projects in one repository, so I will use the Repository Browser windows to create a folder structure prior to importing my files.
I will right-click in the Repository Browser a few times to create a structure where I want to save the files in my “Project X” folder (see image below):
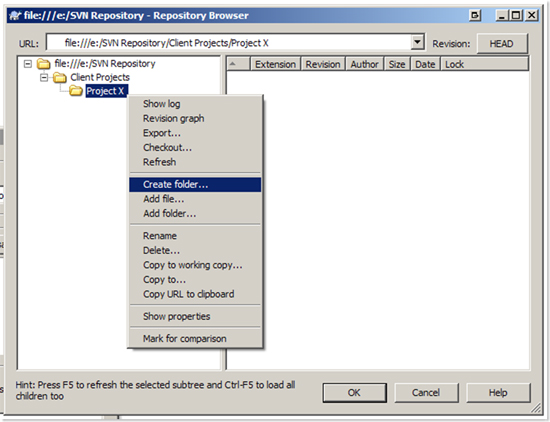
When I’ve created my structure in the repository, I’ll select the “Project X” sub-folder in the Repository Browser window, click OK and I’ll be back in the Import window. Notice the URL in the Import window now points at the sub-folder in the repository.
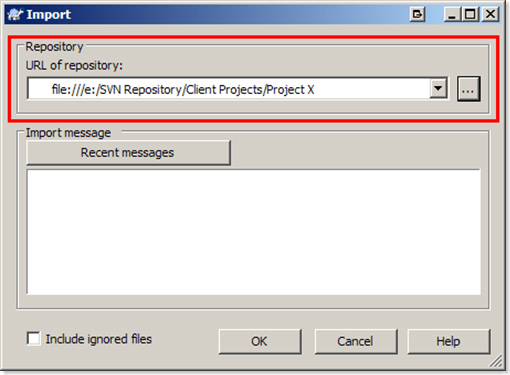
Click OK in the Import window and the files are imported.
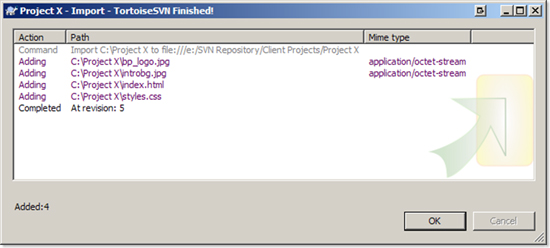
Yay! My files are in the repository. The only problem now is that my files in the repository are not linked to the files in my original “C:Project X” folder. I need to check-out a Working Copy in order to have files to work with.
Checking-Out a Working Copy
To create a working copy of my files on my C: drive I will right-click in the C: explorer window and select “SVN Checkout”.
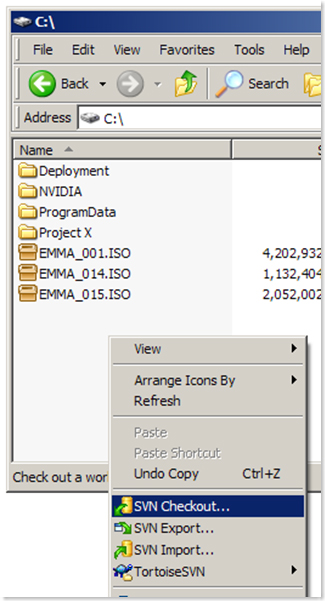
In the Checkout window, the URL will point to the URL where I imported my files, and the Checkout directory will be a new directory on my C: drive where I want a copy of the files so I can work with them. TortoiseSVN will create the directory if it doesn’t exist.
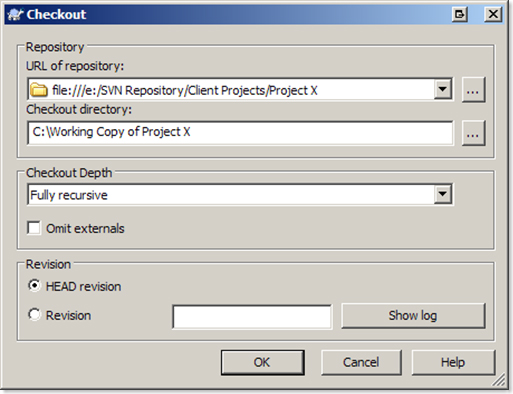
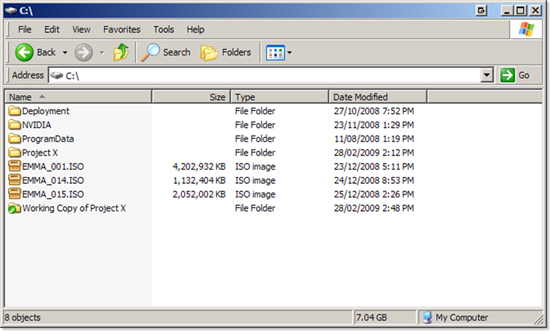
I now have a working copy of the files in my repository. I can now safely delete my original “Project X” directory as all the files are now both in the repository (on my E: drive) and my new working copy (on the C: drive).
Working with your Working Copy
Notice the little green checkmark icon on my working copy directory. This tells me that none of the files inside that directory have been modified since I last got copies from the repository.
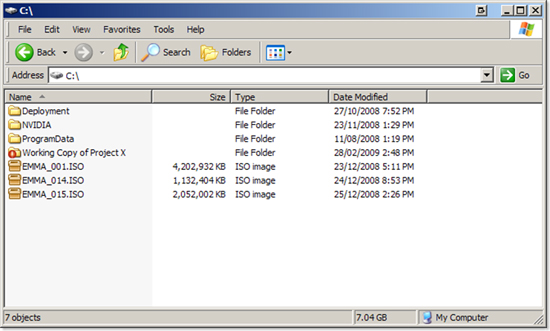
If I modify one of the files in my working copy, I will see a little red exclamation point icon on the folder.
I can then drill down through the folders to find exactly what file has changed, in this case my index.html file.
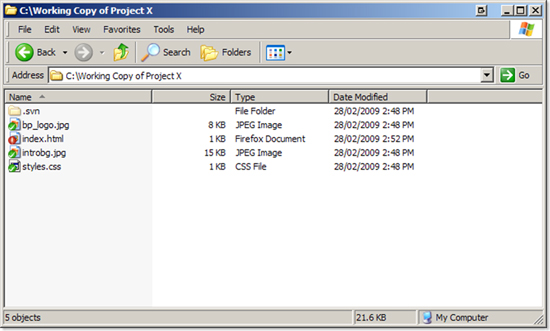
I can right click the file, and chose “SVN Diff (or “TortoiseSVN” > “SVN Diff”) to find out exactly what has changed in the file.
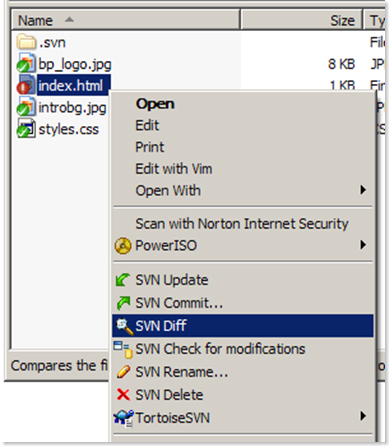
In the image below you can see that I added “: The Web Site” to my title element. Note: the image below is not from the built-in TortoiseSVN Diff tool, but rather from WinMerge. TortoiseSVN’s built-in tool will show you the differences, but you can use other third-party tools if you prefer.
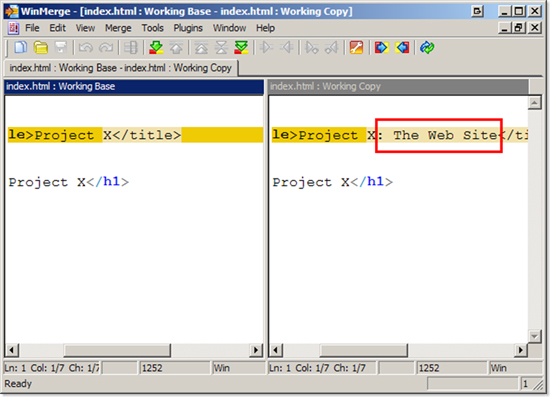
I am happy with that change, so I will go ahead and commit that change to the repository. I right-click on the changed file, and select “SVN Commit” from the context menu.

The commit window gives me a chance to enter a message about the changes made. This can be helpful if you ever need to know exactly when something was changed. Click OK to commit the change.
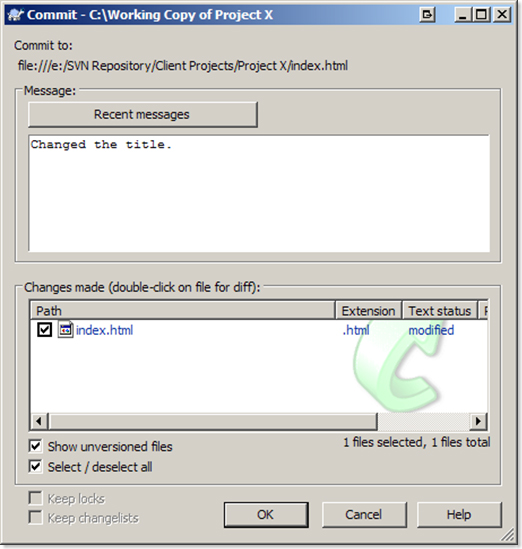
If I now refresh my working copy folder view in Explorer, the icon on the file will change back to the green checkmark meaning that what is in my working folder is up to date with what’s in the repository.
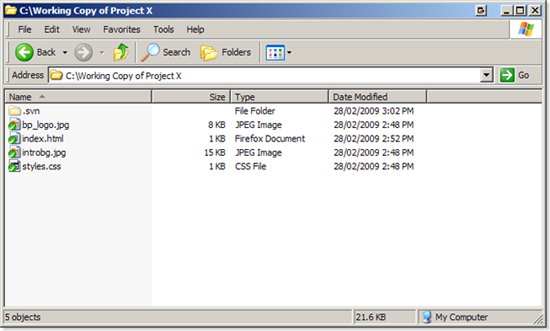
If I wasn’t happy with the changes I had made, I could have done an “SVN Revert” to restore the previous version of the file from the repository rather than committing the change.
Keeping Your Working Copy Up To Date
If you end up with multiple working copies on different computers (for example you have one repository on a shared drive, but you have working copies on both your PC and your laptop) the green checkmark doesn’t guarantee you’ve got the latest version from the repository. The green checkmark means that as far as this working copy is concerned, the last time it checked the repository things were up to date. If you have two working copies and one of them falls behind in terms of being up to date, you can do an “SVN Update” to update a working copy. This will go out and check the repository for updates and update the working copy accordingly.

If I add a new file to my working directory, you notice that it won’t automatically have any associated SVN icon. This is because by default the file will be considered “non-versioned”. To make it versioned you’ll need to right-click it and select “SVN Add”. When you are ready you will still need to commit the file to the repository.
Deleting a File from the Working Copy
If you want to delete a file from the working copy you have to do more than just pressing the delete button. If you just press the delete button, then the repository doesn’t know that you meant to delete it, so the next time you do an update it will re-appear (copied back from the version in the repository). Instead you need to right-click the file and select “SVN Delete”.
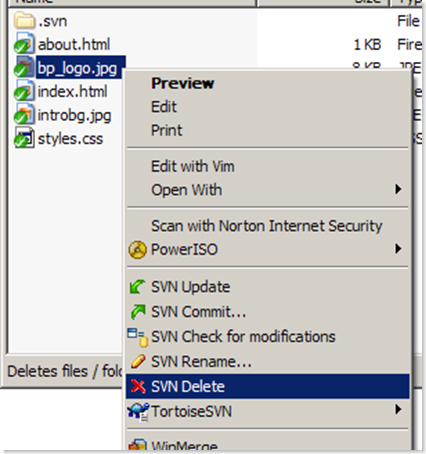
That will delete the file, but also mark the file as deleted within your working copy. You will again need to do an commit to make the deletion in the repository.
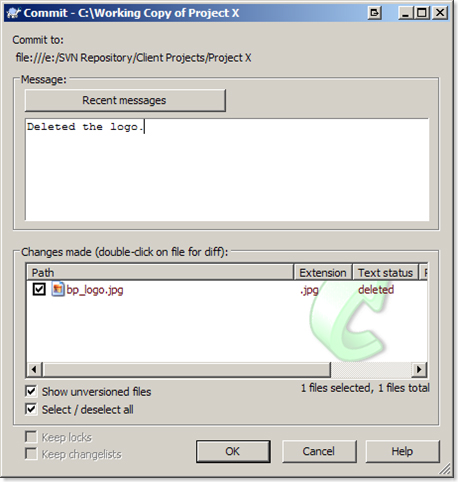
Revisions
Every time you make a commit to the repository, the revision number of the repository increases by one. Revisions are counted for the repository as a whole. The most recent revision can be referred to by the alias “HEAD”.
What are all the .svn folders in my Working Copy?
If you look closely in your working copy, you may see an .svn folder in each folder of your working copy. The folders are hidden folders, so depending on the Windows settings you may not see them, but they are there. Those folders contain the information that Subversion uses to link your working copy to the repository. If ever you need to get a copy of what’s in the repository, but without all the .svn folders, say for example you’re ready to publish it or hand the files over to your client, you can do an “SVN Export” into a new folder to get a “clean” copy of what’s in your repository.
Conclusion
This tutorial has just scratched the surface of what you can do with Subversion. We’ve seen how to create a Subversion repository, add files to it, checkout a working copy, modify, add, delete and commit files to the repository, revert files back from the repository and export a copy of the files suitable for distribution. We haven’t talked about integrating subversion with your favourite editor or IDE, or about advanced topics like tagging, branching. Those are topics worthy of their own tutorial.
I use Subversion on a daily basis for tracking everything from projects I am working on, to configuration files, to my resume.
I hope you found this tutorial useful.

Great work Christopher! I dearly love my Subversion and it’s good to see someone putting the word out there.
Soon there will be a time when all mistakes can just be rolled back
Thanks Luke, I try to push the benefits of version control whenever I can (I’ve even got my wife using Subversion)!
Great article Chris!! This is the most concise and clear subversion tutorial I’ve yet to read! Have you checked out Beanstalk? It’s a sweet hosted svn (subversion) web app.
Thanks Drew. I did actually look into Beanstalk several months ago, not to the point of signing up (but I did try the Open-Source “Warehouse” app they recommend for installing your own Beanstalk-esque web interface).
I really liked Beanstalk’s FTP/SFTP deployment option. Would be really useful for my web hosting clients.
Great article! I put the word out to Alison Lunde who was writing up an SVN article, and she links to yours
Check it out: Getting Started with Subversion Part Two
Very nice!
I cant believe your timing I was trying to figure out how to set up am SVN trunk on my local for my custom version of WP. Way awesome folks you just saved me tons of time figuring it out.
Will be happily web2hoing you now. Hope it does well for you.
Peace
Mich D.
Thanks man. Really great resource! Between this and Rick Strahl’s tutorial I was up and running in no time.
Hi, my svn repository is in live.but Drive size 200GB is going to full.so i am added 500GB Hard disk in same system.How to move my svn repository one drive to another drive (ex:E drive to G drive).please help me,Thanks in advance,Vel